A benefit you get as a result of unwrapping your mesh is the chance to do render baking. Render baking is the process of creating a flat texture for your mesh that’s based on what your mesh looks like when you render it. What good is that? Well, for one example, render baking is really useful to people who want to create models for use in video games. Because everything in a game has to run in real time, models can’t usually have a lot of complicated lighting or highly detailed meshes with millions of vertices. To get around this limitation, you can fake some of these effects by using a texture. And rather than paint on shadows and detail by hand, you can let the computer do the work and use a high-resolution render instead.
Although this technique is used a lot in video games, render baking is also helpful when creating animated models for film or television. If you can create a model that looks really detailed but still has a relatively low vertex count, your rendering and animating process goes faster.
Another use of render baking is for texture painters. Sometimes it’s helpful to have an ambient occlusion or shadow texture as a frame of reference to start painting a more detailed texture. A technique that I like to use is to first rough in colors with vertex painting (see Chapter 8 in Blender For Dummies, 4th edition); then I can bake out those vertex colors to a texture, which can serve as a great starting point for a hand-painted texture.
 So how do you create these baked textures? Well, the magic all happens in the Bake panel in Render Properties. As of this writing, baking is supported only if you’re using the Cycles render engine. The following figure the contents of the Bake panel.
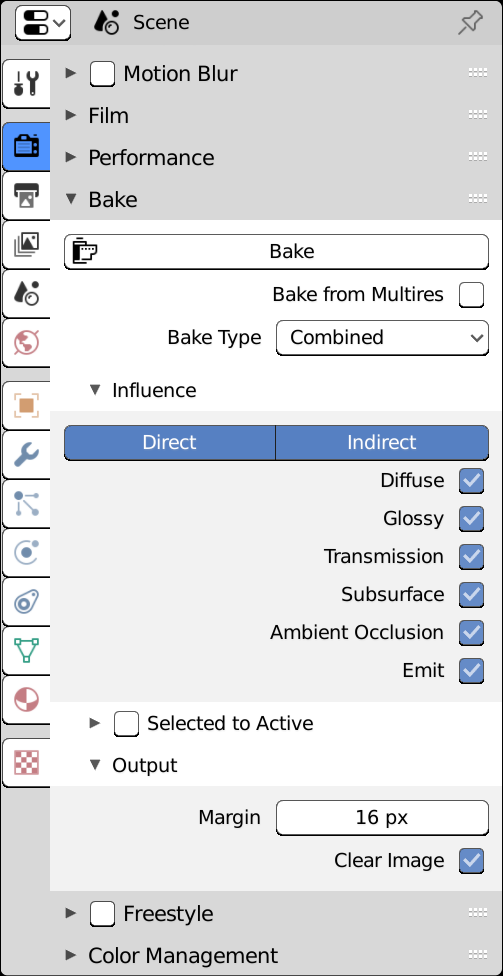
Discovering texture bake options in Cycles
There are a lot of choices in the Bake Type. The following are the most commonly used bake types:
- Combined: This is the whole mess — textures, vertex colors, shadows, ambient occlusion, specular highlights — the works. If you have this bake type selected, you can use the check boxes in the Influence sub-panel to selectively toggle which specific material attributes you’d like to bake.
- Ambient Occlusion: Ambient occlusion, or AO, is an approximated form of global illumination, or the effect that happens from light bouncing off of everything. If you have AO enabled in World Properties, you can bake its results by choosing this option. See Chapter 10 for more on AO.
- Shadow: The Shadow bake type makes a grayscale image texture of the shadows that fall upon your mesh.
- Normal: The Normal bake type generates a normal map. A normal map is similar to a bump map, but instead of just using a grayscale image to define height, normal maps can get even more detailed by using a full-color image to define height as well as direction. A common workflow is to bake the normals from a mesh detailed in Sculpt mode to a low-resolution version of the mesh. This way, you can get details on the model without the additional geometry.
- UV: Choose this option and the UV texture coordinates of your mesh are baked as RGB color data. In a way, the resulting image looks like the results when you bake using the Normal bake type, but the color data gets interpreted differently when you use it.
- Roughness: If your material has nodes that make use of a Roughness value, you can bake all those Roughness values to a single image using this bake type.
- Emit: For materials that also act as light sources (like if you have a robot with glowing eyes), you can bake the strength of the emission value to a texture with this bake type.
- Environment: Cycles materials have no native support for automatically generating environment maps because they rely on raytraced reflections. However, if you need to use your model in a render engine that doesn’t have raytraced reflections, you may want to generate an environment map. Use this bake type to generate that kind of map based on the reflections that Cycles generates for your material.
- Diffuse: Using this option, you can bake any colors connected to the Color socket of a Diffuse BSDF shader or the Base Color socket of a Principled BSDF in your material node network. If you want to bake vertex colors, this is how you do it.
- Glossy: The Glossy option bakes the result of your reflections on the object. This works fine for static scenes, but if anything in those reflections is animated, the result of this bake is inaccurate.
- Transmission: Similar to the Glossy bake type, this option bakes the results of your material. Your baked texture gets what’s seen through transparent parts of your material.
- Subsurface: Choose this bake type to bake the influence of subsurface scattering in your material.
Baking textures
After you have an unwrapped mesh, the steps to bake a new texture are pretty straightforward. The key is in telling Blender where the baked image data should go. To bake effectively, you need to have access to the Shader Editor. I suggest you do your baking from the Shading workspace.
The way baking works, the last selected Image Texture node in the Shader Editor is treated as the active texture. The Image Texture node does not need to be connected to the sockets of any other shader, it just needs to exist somewhere in the Shader Editor. So the process for baking goes something like the following:
-
 Create a new image in the Image Editor at the size you want the texture to be (see “Adding a test grid” earlier in this chapter).
Make a mental note of your new texture’s name. Even better, name it something that makes sense, likeDiffuse Bake. -
 In the Shader Editor, add a new Image Texture node (Add→Texture→Image Texture) to your object’s material.
 - From the Image datablock in your new Image Texture node, choose the image you created in Step 1. on’t select any other nodes after this. Your last selected Image Texture node is your active image texture; this is the texture that Blender bakes to.
-
Choose the type of texture that you’d like to bake from the Bake panel within Render Properties.
- Adjust any additional settings in the Bake panel to taste.
-
 Left-click the Bake button and wait for the texture to be generated.
Texture baking uses render settings, so baking a texture should take roughly as long as rendering the object in your scene.
When baking, your mesh must be visible in your scene. Baking relies on rendering; if the render engine can’t see your mesh for rendering, it also can’t see it for baking. If your object is hidden (or on a hidden layer), you’ll end up with a baked image that’s completely blank.
After you bake an image texture, be sure to save it (File→Save as Image from the Image Editor’s header menu). Saving your .blend file is not enough. You need to explicitly save your bake as a separate image. If you don’t, your baked image texture could be blank the next time you open your .blend file.
You may notice that Step 5 is “Adjust any additional settings in the Bake panel to taste.” The following describes the other options in the Bake panel:
- Selected to Active: This check box and the sub-panel it expands is most useful when baking normal maps and displacement maps. The idea is to bake details from one mesh (the selected object) to another one that has a much lower vertex count (the active object). Enable this check box to get that effect.
When you select multiple objects, the last object you select is the active object.
- Cage: This option is available only if the Selected to Active check box is enabled. It’s not uncommon that Ray Distance (described momentarily) is insufficient for producing a completely clean baked texture. There may occasionally still be artifacts (unexpected glitches in the baked image). It’s often useful to duplicate your target mesh and push its vertices around (do not add or delete vertices) so they cleanly fit within the geometry of the source mesh. This duplicated mesh is called a cage object. Enabling the Cage check box gives you the ability to reference the cage object when baking and get that refined control.
- Extrusion: This control is visible only if the Cage check box is enabled. When using a cage object to bake (see the next option), you still may need to have control similar to what Ray Distance gives you. That control is what you get with the Extrusion property.
- Cage Object: Use this field to type or pick the name (you named it something meaningful, right?) of your cage object.
- Ray Distance: This option is available only if the Selected to Active check box is enabled and the Cage check box is disabled. When baking textures from one object to the other, it’s ideal to have the target object fully enclosed by the source. However, this isn’t always a possibility, so you can adjust the Ray Distance value to massage the final output to look more favorable.
- Output: These properties are available in the Options sub-panel.
- Margin: You can tell Blender to extend the baked colors beyond the outer edges of islands, or patches of linked vertices, in your UV layout. You want to have a bit of a margin to make the seams in your texture less visible. The default value of 16 pixels is usually fine, but if the islands in your UV layout are close together or near the image edge, you may want to reduce this value.
- Clear Image: Enable this check box to blank out an image prior to baking. If you’re baking multiple objects to the same image texture, you may need to bake multiple times. If that’s the case, you’ll want to disable the Clear Image check box so your previous bakes don’t get obliterated.
Latest Posts

Stickman!
Baking Texture Maps from Your Mesh